What's New in GNS3 1.2.1

GNS3 1.2.1 version has released on 5th December 2014, and they have introduced a couple of fixes like:
  • Early support for IOSv and IOSv-L2 (with Qemu for now, which is slow on Windows/Mac OS X).
  • Support for CPU throttling and process priority for Qemu.
  • Support for full screen mode (View -> Fullscreen).
  • Bundled Qemu 0.13.0 in the Windows all-in-one. Default for all local Qemu VMs.
  • Bundled Qemu 0.14.1 in the Mac OS X App. Default for all local Qemu VMs.
  • Changed ASA defaults to use Qemu 0.13.0 (on Windows), have 4 interfaces and CPU throttling to 65%.
  • Fixed SecureCRT command line when space in the device name.
  • Fixed C7200 IO cards insert/remove issues and makes C7200-IO-FE the default.
  • Fixed port sorting issues.
  • Added default path for VBoxManage on Mac OS X
  • Upgraded gns3-converter to version 1.1.1 for Windows all-in-one and Mac OS X DMG.
  • New idle-PC field validation.
  • Possibility to load the project from command line (or double-click on a project on Windows).
  • Fixed Unicode error when using VirtualBox VM with a name containing non-english characters.
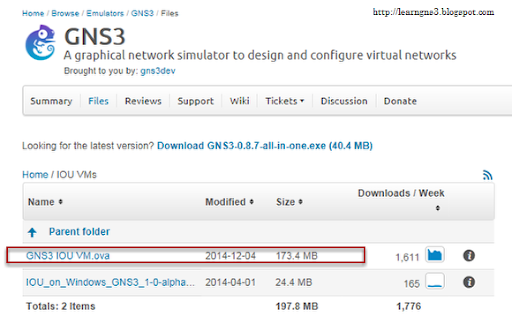
  • Updated the IOU VM with iouyap version 0.95 (packet capture).
From Source: GNS Community
A copy of GNS3 1.2.1 for Windows can be download from this link GNS community download source

Cisco IOU VM run with errors after installing GNS3 1.1 to GNS3 1.2

GNS3 1.2 had different skin layout.

Warning: Node Creation

media_1420362633963.png

It still allows to create a node after clicking OK. At certain point, there will be error occurred after connecting the IOU to other devices.

media_1420364114052.png

At some point, when creating topology, or connected with various IOU or devices, there will be error that you might encountered example:
=> Server error [-3200] from 127.0.0.1:8000: R1: Could not communicate with 127.0.0.1:7202
Server error [-3200] : Communication timed out with 127.0.0.1:7202 :[WinError 10053] An established connection was aborted by the software in your host machine
Server error [-3200] from 127.0.0.1:8000: R1: Could not communicate with 127.0.0.1:7202

Allowing Internet Connection to GNS3 IOU VM

media_1420363653214.png

Internet connection is required to allow the GNS3 IOU VM to download packages from the internet to upgrade the software.
Note: The GNS3 IOU VM is current running, hence you might need to re-enable the network interface inside the GNS3 IOU VM.

media_1420363689830.png

This is the default Network configuration settings. Be sure to change back to this settings once the GNS3 IOU VM had been updated.

media_1420373936216.png

Note: If you had more than two Network Connection e.g. Wireless connection and LAN connection, make sure you select the one with Internet Connection. In this scenario, Broadcom 802.11n Wireless USB adapter is selected as I am using Wireless for my Internet connection from my laptop.

media_1420374216700.png

In the GNS3 IOU VM Virtualbox Console, disabling and enabling of the ethernet port 0 is required to allow the settings to take effect.
root@gns3-iouvm:~# ifdown eth0
root@gns3-iouvm:~# ifup eth0

Note: If you had not Power On the GNS3 IOU VM from Virtualbox and applied the settings, than this steps is not required. Just Power on the VM after apply the network settings.

media_1420375801878.png

root@gns3-iouvm:~# pip3 install gns3-server==1.2

media_1420376018355.png

media_1420376094242.png

Remember to change the network settings back from GNS3 IOU VM Settings. Ensure to change the
Attached to: Host-only Adapter
Name: VirtualBox Host-Only Ethernet Adapter

media_1420376559499.png

Go back to the GNS3 IOU VM Console and reboot the GNS3 IOU VM.
root@gns3-iouvm:~# reboot

Upgrading GNS3 1.1 to GNS3 1.2

Refer to the "What's New" in GNS3 1.2 to obtain a copy of GNS3 1.2 version for Windows.

When running the GNS3 1.X setup file, usually there will be an security prompt for Windows 7 users "The publisher could not be verified. Are you sure you want to run this software?" Proceed to press Run button to continue.

media_1420273469618.png

Select Next > to proceed

media_1420273511073.png

Select I Agree.

media_1420273520425.png

Select Next >

media_1420273575842.png

Select Next >
Note: SuperPutty is optional as this is use for Terminal Console e.g. Telnet, SSH

media_1420273581751.png

Select Install and it will be placed in the default directory C:\Program Files\GNS3. Difference path and destination folder can be selected.

media_1420273595458.png

Since WinPcap 4.1.3 had been installed, proceed to press Cancel. If you still want to install WinPcap, refer to previous post on GNS3 1.1 Part 1 guide.

media_1420273644772.png

Select cancel if you had previously install GNS3 1.1 before as GNS3 1.1 uses Wireshark(64-bit) 1.12.1. Wireshark 32-bit is the same version as well.

media_1420273899668.png

If you previous install Wireshark before from GNS3 1.1, just select Cancel as the wireshark version is the same. This applied to Wireshark 1.12.1 (32-bit) as well. If you still want to install Wireshark. refer to previous post on GNS3 1.1 Part 1 guide.

media_1420273979908.png

If you previous install SolarWinds Response Time Viewer before from GNS3 1.1, just select Cancel as the SolarWinds Response Time Viewer version is the same. If you still want to install refer to previous post on GNS3 1.1 Part 2 guide.

media_1420273999937.png

media_1420274012059.png

Select Next >

media_1420274020721.png

Prefer to uncheck before pressing the finish button.

What's New in GNS3 1.2

GNS3 1.2 version has released on 20th November 2014, and they have introduced so many new features like:
  • New VirtualBox support.
  • New GUI styles: charcoal (default) & classic. Changing GUI Preferences.
  • Integration of GNS3 converter (allows old .net topologies to be opened).
  • VirtualBox linked clones support (experimental, still some problems with temporary projects).
  • Allow Qemu VM to have no interface.
  • Option to allow console connections to any local IP address when using the local server.
  • Automatically extract IOS configs when a project is closed.
  • Show the cancel button in Wizards on Mac OS X.
  • Fix crash on Windows 32-bit.
  • Fix “new project” bug when using the GNS3 IOU VM.
  • Fix “could not find unused port” WinError 10013 bug qemu-system-i386 is the new default on 32-bit platforms.
  • Option to deactivate the new project dialog at startup.
  • Add “open a project” and “recent projects” buttons to the new project dialog.
  • New host node (cloud with all available Ethernet & TAP interfaces added).
  • Fix platform detection issue with some Cisco IOS image file name.
  • Add delay (default 500 ms) when Console to all nodes.
  • Check for duplicate node names in Preferences.
  • Fix bug when editing a Qemu VM configured to run on a remote server.
  • News dock widget is smaller.
  • Add detection of qemu and qemu.exe binaries.
  • New Telnet server for VirtualBox.
  • Fix SecureCRT issue when disconnecting from an IOU device on Windows.
  • Update VPCS to version 0.6 in the all-in-one installer.
From Source: GNS Community
A copy of GNS3 1.2 for Windows can be download from this link (source 1)

Importing Cisco IOU VM into Virtualbox

Importing Cisco IOU VM into Virtualbox, the Cisco IOU VM can be obtained from this < http://sourceforge.net/projects/gns-3/files/IOU%20VMs/ >.
media_1420504468254.png
Download the GNS3 IOU VM.ova file as of latest.
media_1414226678019.png
Launched Oracle VM VirtualBox Manager.
media_1414226707749.png
File > Import Appliance...
media_1414226724885.png
Browse to the download GNS3 IOU VM.ova file
media_1414226751806.png
Open the GNS3 IOU VM.ova file.
media_1414226767333.png
Select Next
media_1414226952725.png
Select Import. Be sure there is enough RAM on the PC/Laptops.
media_1414226962370.png
media_1414226972521.png
Select Settings. Do not Start yet. Configure the Network Settings.
media_1414226987589.png
In the Settgs, ensure Network Adapter 1 is Host-only Adapter on VirtualBox Host-Only Ethernet Adapter.
media_1414227038291.png
Power on the GNS3 IOU VM.
media_1414241622689.png
Login into the GNS3 IOU VM console with login:password as root / cisco.
media_1414241753228.png
Confirm the GNS3 IOU Host IP address is 192.168.56.101.
media_1414227150515.png
Use any Internet Browser and goto http://192.168.56.101:8000/upload
media_1414227184129.png
Select the Cisco IOU image.
Note: Image cannot be provided but google is always your best friend. The hint I can give is search for this i86bi_linux_l2-ipbasek9-ms.may8-2013-team_track and i86bi_linux-adventerprisek9-ms.152-4.M1
media_1414227195790.png
Click upload
media_1414227203744.png
Upon complete, the IOU path will be printed on the Files on 192.168.56.101:8000
media_1414241846206.png
Proceed to upload other IOS image file till completed.
media_1414241970527.png
Do not save any project, just cancel. Edit > Preferences...
media_1414242076127.png
Select Add to add the "Virtualbox GNS3 1.0 IOU VM" host IP address into the Remote servers. Apply. Do not click OK yet, we going to configure the IOS on UNIX.
media_1414242364206.png
For Cisco IOS, it required a license number to operated hence a license key is required to be pushed to the server. The licence can be download in this link. If you run into any issue with licensing, visit this forum http://forum.gns3.net/topic9032.html .
media_1414242347850.png
My personal reference is copy and paste the file iourc.txt that I download into C:\Program Files\GNS3 making it easy for me to just browse to one location.
media_1414242388375.png
Once the iourc.txt is specify, select Apply. Do not click OK yet, there is additional settings to be configure in IOU devices.
media_1414243195350.png
Adding the IOU device, before that the IOU path field is required. Let take a look how to quickly copy the path.
media_1414243102472.png
Confirm the images is upload into GNS IOU VM going into
cd /home/gns/GNS3/images
ls -l
pwd
(All case sensitive for above three line commands)
media_1414243124477.png
Remember this, there is trick. Using any Internet Browser, open up 192.168.56.101:8000 and the Files on 192.168.56.101:8000 will be displayed. Highlight the path and copy to the next step. I am going to use this L2 Switch image for this illustration.
media_1414243241625.png
Select Remote and ensure that Run on server with 192.168.56.101:8000 is selected. It can be on different IP address as long the remote servers is selected corrected.
media_1414243324482.png
Copy and paste the IOU image path. For the name, any name can be specify as I choose to use the image name. L2 image is for this illustration, as L3 image is the same procedure.
media_1414243344093.png
media_1414243414396.png
Drag the IOU L2 Switches from the Switches panel and happy GNS3!. Continued and repeat the steps with a L3 Router as well