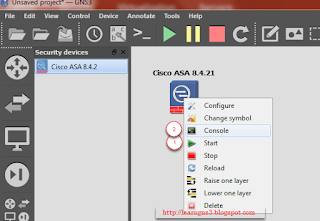
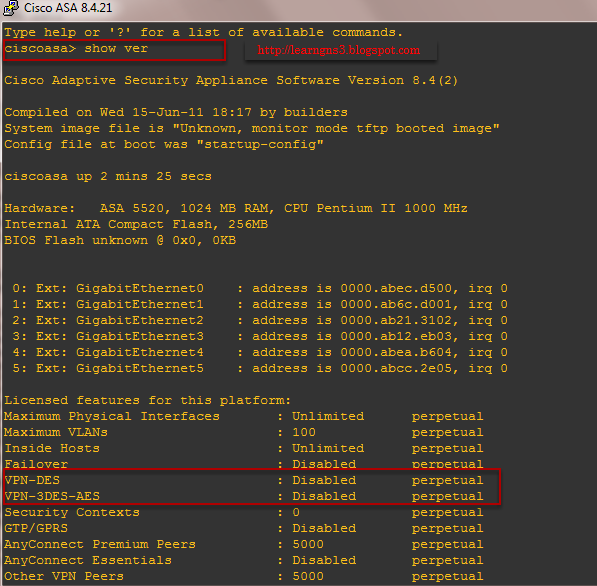
Start the ASA and look at the console.
The VPN encryption feature is disabled and required to perform some activation.

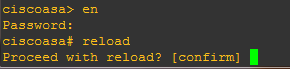
en
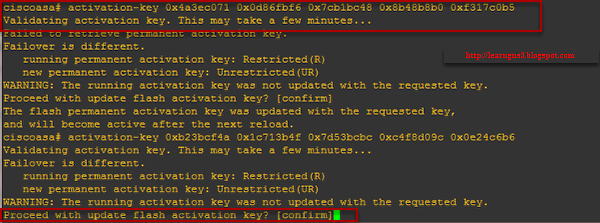
activation-key 0x4a3ec071 0x0d86fbf6 0x7cb1bc48 0x8b48b8b0 0xf317c0b5
reload
Note: Be sure to type reload once this key is activated, else it won't be working. This might take up to 5 minutes once the reload had been confirm. Press enter to confirm.
Applying the second activation key
 Enable the ASA in the console
activation-key 0xb23bcf4a 0x1c713b4f 0x7d53bcbc 0xc4f8d09c 0x0e24c6b6
This process might take up to 10 minutes
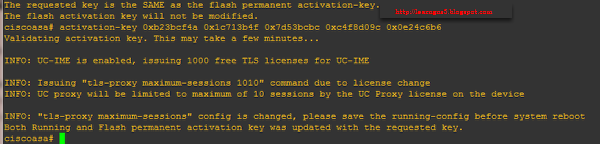
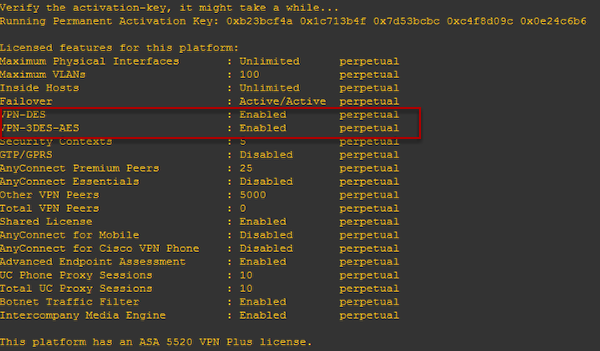
The VPN encryption feature had been enable successful. If you hit problem activating, the issue could be when activating the first key "activation-key 0x4a3ec071 0x0d86fbf6 0x7cb1bc48 0x8b48b8b0 0xf317c0b5", there is no reload done which why it is stuck there. Go back to the Applying the first activation key and not to miss that important steps of reload the ASA after inputing the keys.
Troubleshooting: Network error: Connection refused!

Ensure that there is only 1 console window running. They could be two session running which why it is restarting and Connection refused!

copy running-config startup-config
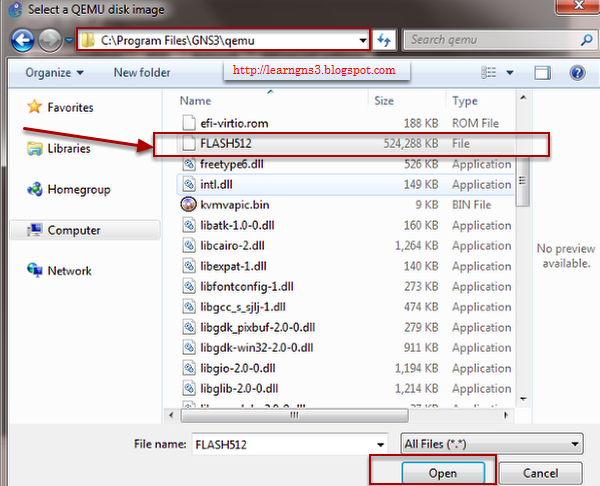
copy startup-config disk0
This is what allows configurations consistent through a restart.
Troubleshooting: Always getting stuck at Ethernet Giga eth5 Lan Connection on the console screen

Leave with the default settings as noted was:
Kernal command line: ide_generic.probe_mask=0x01 ide_core.chs=0.0:980,16,32 auto nousb console=ttyS0,9600 bigphysarea=65536 ide1=noprobe no-hlt
Additional settings, Options: -nographic -cpu coreduo -icount auto -hdachs 980,16,32
Note: Leave the Kernal command line and do not change anything if you are using GNS3 1.2 and above as changing might have "Interface GigabitEthernet5 "", is administratively down, line protocol is up" stuck for 5 minutes.
Change (tweak) Settings:
Kernal command line: -append ide_generic.probe_mask=0x01 ide_core.chs=0.0:980,16,32 auto nousb console=ttyS0,9600 bigphysarea=65536 ide1=noprobe no-hlt -net nic
Additional settings, Options: -vnc none -vga none -m 1024 -icount auto -hdachs 980,16,32
In old GNS3 0.8.X
Kernal command line: -append ide_generic.probe_mask=0x01 ide_core.chs=0.0:980,16,32 auto nousb console=ttyS0,9600 bigphysarea=65536
Additional settings, under Options, best recommended setting is: -vnc none -vga none -m 1024 -icount auto -hdachs 980,16,32
Troubleshooting: How to erase all the configuration and start a new config again ASA without adding or install in GNS3

Note: This step is optional.
Erase the configuration in flash memory
enable
wr era
There is no password, just press enter

We will not pre-configure the firewall.Type n and press enter
Applying the second activation key
activation-key 0xb23bcf4a 0x1c713b4f 0x7d53bcbc 0xc4f8d09c 0x0e24c6b6
This process might take up to 10 minutes
Ensure that there is only 1 console window running. They could be two session running which why it is restarting and Connection refused!
- Tried to exit GNS3 to see if it helps
- Create a new Project
copy startup-config disk0
This is what allows configurations consistent through a restart.
Troubleshooting: Always getting stuck at Ethernet Giga eth5 Lan Connection on the console screen
Kernal command line: ide_generic.probe_mask=0x01 ide_core.chs=0.0:980,16,32 auto nousb console=ttyS0,9600 bigphysarea=65536 ide1=noprobe no-hlt
Additional settings, Options: -nographic -cpu coreduo -icount auto -hdachs 980,16,32
Note: Leave the Kernal command line and do not change anything if you are using GNS3 1.2 and above as changing might have "Interface GigabitEthernet5 "", is administratively down, line protocol is up" stuck for 5 minutes.
Change (tweak) Settings:
Kernal command line: -append ide_generic.probe_mask=0x01 ide_core.chs=0.0:980,16,32 auto nousb console=ttyS0,9600 bigphysarea=65536 ide1=noprobe no-hlt -net nic
Additional settings, Options: -vnc none -vga none -m 1024 -icount auto -hdachs 980,16,32
In old GNS3 0.8.X
Kernal command line: -append ide_generic.probe_mask=0x01 ide_core.chs=0.0:980,16,32 auto nousb console=ttyS0,9600 bigphysarea=65536
Additional settings, under Options, best recommended setting is: -vnc none -vga none -m 1024 -icount auto -hdachs 980,16,32
Troubleshooting: How to erase all the configuration and start a new config again ASA without adding or install in GNS3
Note: This step is optional.
Erase the configuration in flash memory
enable
wr era
There is no password, just press enter
We will not pre-configure the firewall.Type n and press enter


